Adding computers using the wizard
The Add computers from... wizard discovers computers in your environment and adds them to the list in one operation. Pick a source, configure it, watch the discovery run, then decide how the results fit into your existing list.
The wizard works in three steps. First you choose a source and fill in its settings. Different sources need different details: a domain name for Active Directory, a start and end address for an IP range, a host name for Hyper-V. Next, the wizard scans that source and shows the computers it finds. Finally you choose where the discovered names land in your list and what happens when a name is already there. Each source has its own page below that explains its settings.
Opening the wizard
Choose Computers > Add computers from... from the main menu.
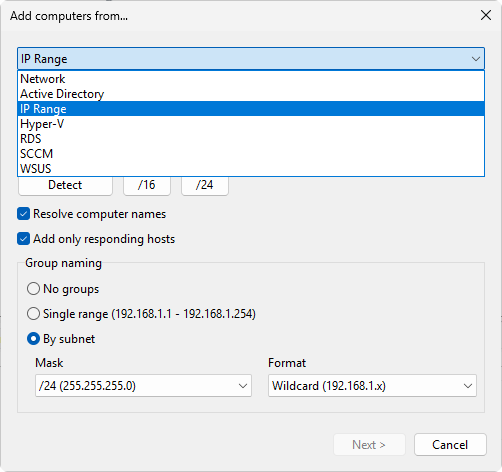
Step 1: Import from
Pick a source from the Import from dropdown:
- Network - browse computers visible on the local network
- Active Directory - query computer accounts from a domain
- IP range - scan a range of IP addresses (the default selection)
- Hyper-V - enumerate virtual machines on a Hyper-V host
- RDS - read session hosts from a Remote Desktop Connection Broker
- SCCM - query devices from a Configuration Manager site
- WSUS - read clients from a Windows Server Update Services database
The panel below the dropdown changes to show the settings for the selected source. Each source has its own page in this section that documents its fields.
Click Next > to start discovery.
Step 2: Search
The wizard runs the source in the background and adds names to the Found computers tree as they are found. An activity indicator spins while the scan is in progress. You can:
- Wait for the scan to finish.
- Click Next > as soon as enough machines have appeared (further results stop being added once you move on).
- Click < Back to change source settings.
If the scan finishes with zero results, Next > stays disabled. There is nothing to import, so the wizard expects you to go < Back, switch to a different source or change the parameters, and try again. Cancel also works if you want to abandon the operation.
Step 3: Finish
Pick a Target group for the discovered computers:
- Keep original grouping - keep the hierarchy returned by the source (for example, the organizational unit tree from Active Directory).
- New group - put everything into a new folder. Type the folder name in the field below this option.
- Existing group - pick a folder from the dropdown of groups that already exist in the list.
Then choose how to handle names that are already in the list under Duplicates:
- Skip duplicates - leave existing entries alone, add only new names. This is the default.
- Add duplicate - add discovered names even if they duplicate existing ones.
- Replace existing - delete existing entries with the same name, then add the new ones.
Click Finish to write the discovered computers into your list. Click Cancel at any point to abandon the wizard.
Sources
- Network source - browse computers visible on the local network
- Active Directory source - query computer accounts from a domain
- IP range source - scan a range of IP addresses
- Hyper-V source - enumerate virtual machines on a Hyper-V host
- RDS source - read session hosts from a Remote Desktop Connection Broker
- SCCM source - query devices from a Configuration Manager site
- WSUS source - read clients from a Windows Server Update Services database
Topics
- Network source
- Active Directory source
- IP range source
- Hyper-V source
- RDS source
- SCCM source
- WSUS source