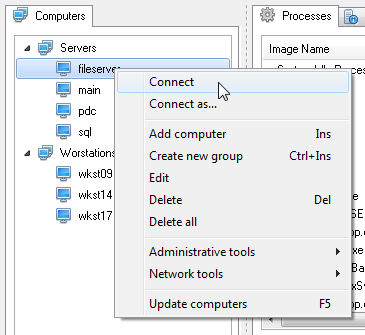
Computer list
The computer list occupies the left part of the application window.
The Computer List panel shows the list of computers in the form of a tree where you can see computers and computer groups. Computer groups are used to group computers not only by their domain names, but also logically. You can create any number of groups and computers. It is possible to change the properties of whole computer groups. The drag-n-drop technology is supported.
A right click on a group or on a computer opens a popup menu where you can access commands related to managing the entire list or the item.

- Connect – Connect to the remote computer selected in the computer list.
- Connect as – Connect to the remote computer selected in the computer list with specified credentials.
- Reconnect – reconnect to the remote computer.
- Disconnect – Disconnect from the remote computer. After you execute this command, you will see processes running on the local computer in the process list.
- Add computer – Add a computer to the computer list. If you select this item, you will see either the “Add Computer“ dialog box.
- Create new group – Create a new group in the computer list. Computer groups help you arrange computers in the list. You can add computers from different departments in your company to different groups, which will make searching for them easier in the future.
- Edit – edit the selected computer or group.
- Delete – Delete the selected computer.
- Delete – Delete all computers from the list.
- Administrative tools - administrative tools to manage a remote computer
- Network tools - network tools to monitor a remote computer
- Update computers – Update the state of computers in the computer list. The method selected in the preferences (ping, a connection to the specified port) is used to check the state.