Message presets
A preset is a saved message you can apply with one click. Presets are organized into categories.
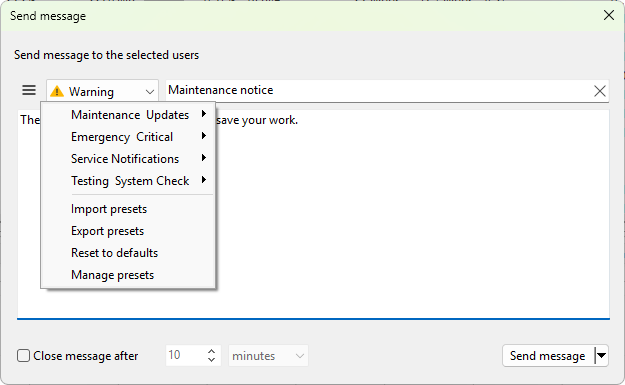
Opening the preset manager
The preset manager opens from the Send message dialog. Click the menu (hamburger) button to the left of the message-type dropdown on that dialog, then choose Manage presets. The Manage presets window opens with a tree of categories on the left and the items in the selected category on the right.
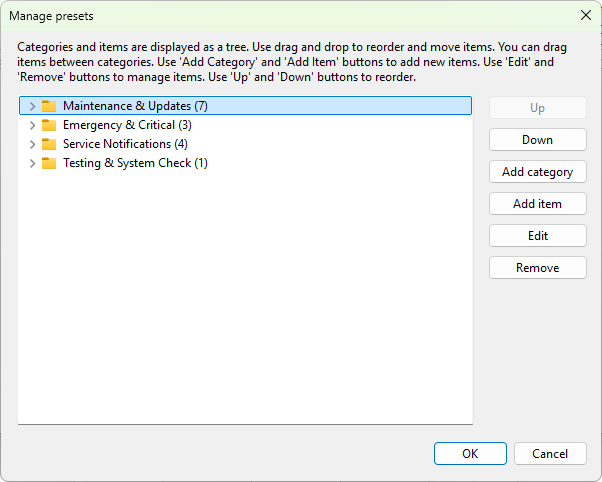
Adding a category
Click Add category. Type a name and click OK. Categories are flat; they do not nest.
Adding a preset
Select the category and click Add item. The Create preset dialog opens with these fields:
- Preset name - what the preset is called in the menu. Required.
- Title - the message-box title used when this preset is applied.
- Message - the message text. The same
%computer_name%,%user_name%,%date%,%time%, and%time_now%placeholders described in Sending a message are substituted at send time. - Message type - None, Info, Warning, or Error.
Editing, deleting, and reordering
Select a preset or category and use the toolbar buttons or context menu to Edit, Remove, or Up / Down. You can also drag items between categories. Deleting a category also deletes every preset inside it; the manager asks to confirm.
Import, export, and reset
The menu (hamburger) button on the Send message dialog also offers Import presets, Export presets, and Reset to defaults commands. Import and export work on the whole preset tree as a single file; reset replaces the tree with the shipped defaults.
Applying a preset
Click the preset button on the Send message dialog. A popup menu opens listing categories as submenus and presets as their items. Click a preset to load its title, body, and type into the dialog. Edit the timeout or text if you need to, then click OK to send.
Storage
Presets are kept in the program's SQLite database along with other settings. They survive program restarts and travel with the configuration backup.